
Post by summer201016 on Jan 5, 2013 6:43:33 GMT 3
ISO picture files are single files that incorporate the finish framework or "image" of the disk, a great deal like a disk snapshot. IT personnel normally use disk picture files to clone, reinstall or set up working methods. You already know you happen to be coping with 1 of those archives after you see the. iso file extension. ISO pictures is usually burned to Compact disc or DVD for use on other computer systems or sharing with other people. You could build ISO pictures from any resource disk or information by utilizing the command line in Mac OS X. But by doing this is tricky for computer system newbie. For any starter, we are able to use disc creator program for Mac which ordinarily permits consumer for making ISO picture. Right here are comprehensive ways for building video clips to ISO on Mac.
Burn up video clip to DVD/Blu-ray disc
1: Include video clip files
You could drag and drop media files to input, or include video clip files by clicking for the "Add" icon, or click on "File" button to import video clip files.
Note: You could pick out to burn up to DVD-5/DVD-9/BD-25/BD-50, select up an specific element ratio four: three or sixteen: 9 (when burning to BD, only sixteen: 9 is obtainable). Lower Quality/Medium Quality/High High-quality is ready to suit your needs to select. Room desired for Blu-ray or DVD burning is usually accessed.
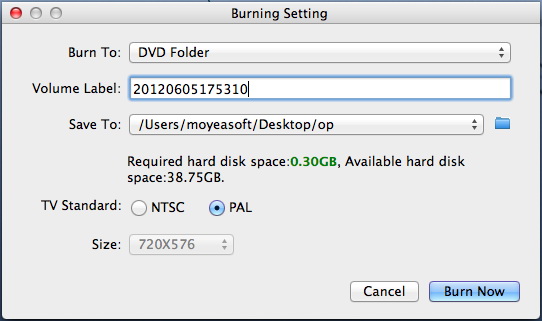
2: Crucial Burning Setting
Click for the "Burn to DVD & Blu-ray" button and the Burning Setting interface will pop up. You could carry out the following settings:
"Burn to": DVD Disc/Folder, Blu-ray Disc/Folder, or ISO File
"Volume Label": input your own volume label
"Save to": pick out a path on Mac to save output file
"TV Standard": select NTSC or PAL TV Standard according to region
3: Start to make ISO on Mac
Insert blank disc and click for the "Burn Now" button within the previous step then you could start to burn up video clip to DVD or Blu-ray disc.
Note: You could pick out to burn up to DVD-5/DVD-9/BD-25/BD-50, select up an specific element ratio four: three or sixteen: 9 (when burning to BD, only sixteen: 9 is obtainable). Lower Quality/Medium Quality/High High-quality is ready to suit your needs to select. Room desired for Blu-ray or DVD burning is usually accessed.
Burn up video clip to DVD/Blu-ray disc
1: Include video clip files
You could drag and drop media files to input, or include video clip files by clicking for the "Add" icon, or click on "File" button to import video clip files.
Note: You could pick out to burn up to DVD-5/DVD-9/BD-25/BD-50, select up an specific element ratio four: three or sixteen: 9 (when burning to BD, only sixteen: 9 is obtainable). Lower Quality/Medium Quality/High High-quality is ready to suit your needs to select. Room desired for Blu-ray or DVD burning is usually accessed.
2: Crucial Burning Setting
Click for the "Burn to DVD & Blu-ray" button and the Burning Setting interface will pop up. You could carry out the following settings:
"Burn to": DVD Disc/Folder, Blu-ray Disc/Folder, or ISO File
"Volume Label": input your own volume label
"Save to": pick out a path on Mac to save output file
"TV Standard": select NTSC or PAL TV Standard according to region
3: Start to make ISO on Mac
Insert blank disc and click for the "Burn Now" button within the previous step then you could start to burn up video clip to DVD or Blu-ray disc.
Note: You could pick out to burn up to DVD-5/DVD-9/BD-25/BD-50, select up an specific element ratio four: three or sixteen: 9 (when burning to BD, only sixteen: 9 is obtainable). Lower Quality/Medium Quality/High High-quality is ready to suit your needs to select. Room desired for Blu-ray or DVD burning is usually accessed.