
Post by summer201016 on Dec 28, 2012 7:09:19 GMT 3
In this article, we are going to master methods to convert PowerPoint to MP4.
Immediately after convert PowerPoint to MP4 video clip, we could view the PowerPoint video on media players, mobile devices, burn it to DVD and in many cases share it on YouTube, blogs or other online websites. Meanwhile, video file usually are more challenging to get changed than PowerPoint files.
To convert PowerPoint to MP4, an expert PowerPoint to MP4 converter might be beneficial. This kind of software can quite easily and instantly convert PowerPoint files to MP4 likewise as retain the original effects, like animations, video clips, audios, photographs, and so forth.
Manual: methods to convert PowerPoint to MP4?
1. Load the PowerPoint files to your program
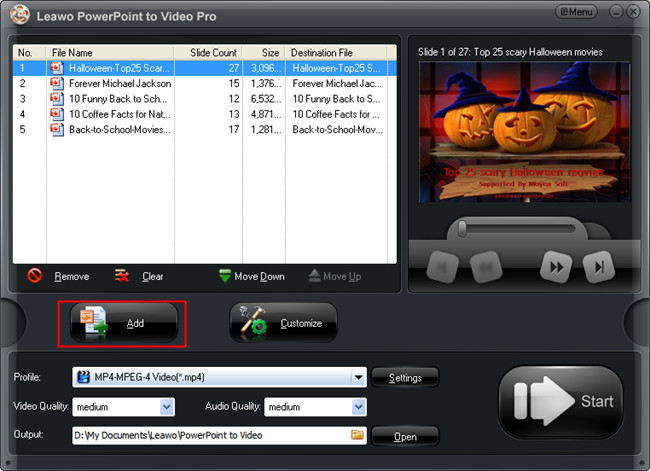
Get started the PowerPoint to MP4 converter, click on the Add button and select the preferred PowerPoint files to import. You're able to pick one on the PowerPoint files and preview it on the right side to guarantee you will have imported the right file.
2. Set output
Press the Profile frame and go for MP4 since the output video clip format. Set an Output folder for the converted MP4 video clip to ensure that you can identify it quite easily. Under the Profile frame are two simple quality switches for video and audio.
3. Advanced settings
For advanced settings, simply click Settings button on the right. It's possible you'll modify the video codec, audio codec, quality, bit rate, frame rate, video size, and so forth during the popup Profile interface to meet up with your specified wants. You're able to save any adjustments as being a new profile for later use.
4. Customize output MP4 video clip
This PowerPoint to MP4 converter features lightweight but efficient video clip editing elements for video customizations. Click the Customize button and enter the Customize Settings panel, exactly where you could possibly set any tab of Timing, Music, Audio, Slide and Conversion to alter the slide time duration, include PowerPoint background music, etc.
5. Start conversion
Ultimately, return to the home panel and then click start icon to end the conversion.
Immediately after convert PowerPoint to MP4 video clip, we could view the PowerPoint video on media players, mobile devices, burn it to DVD and in many cases share it on YouTube, blogs or other online websites. Meanwhile, video file usually are more challenging to get changed than PowerPoint files.
To convert PowerPoint to MP4, an expert PowerPoint to MP4 converter might be beneficial. This kind of software can quite easily and instantly convert PowerPoint files to MP4 likewise as retain the original effects, like animations, video clips, audios, photographs, and so forth.
Manual: methods to convert PowerPoint to MP4?
1. Load the PowerPoint files to your program
Get started the PowerPoint to MP4 converter, click on the Add button and select the preferred PowerPoint files to import. You're able to pick one on the PowerPoint files and preview it on the right side to guarantee you will have imported the right file.
2. Set output
Press the Profile frame and go for MP4 since the output video clip format. Set an Output folder for the converted MP4 video clip to ensure that you can identify it quite easily. Under the Profile frame are two simple quality switches for video and audio.
3. Advanced settings
For advanced settings, simply click Settings button on the right. It's possible you'll modify the video codec, audio codec, quality, bit rate, frame rate, video size, and so forth during the popup Profile interface to meet up with your specified wants. You're able to save any adjustments as being a new profile for later use.
4. Customize output MP4 video clip
This PowerPoint to MP4 converter features lightweight but efficient video clip editing elements for video customizations. Click the Customize button and enter the Customize Settings panel, exactly where you could possibly set any tab of Timing, Music, Audio, Slide and Conversion to alter the slide time duration, include PowerPoint background music, etc.
5. Start conversion
Ultimately, return to the home panel and then click start icon to end the conversion.